Building a Basic Power App with No Prior Knowledge
In our February Tech Talk, Michelle Willard, SharePoint architect and Power Apps expert, dove deeper into building a basic Power App with no prior knowledge. Below is a step-by-step guide that anyone could follow to create a Power App from scratch:
Case Example
We are a grooming salon for pets, and we are trying to build an app that will help us keep track of appointments.
Data Columns
- First Name
- Last Name
- Pet Name
- Type of Animal
- Procedure
- Additional Services
- Date + Time
- Cost
Add at least one row of data. You can fill out your own pet’s information!

-
Upload or enter your data into a SharePoint List
-
Column Formatting
- Categorize them by the appropriate fields (text, choice, number, etc.)
- To make things easier for Power Apps, name your columns without spaces (ex: ‘petname’ instead of ‘Pet Name’). You can change this on the Power App later.
Import Data into Power Apps
-
Go to web.powerapps.com
-
Import Data
- Scroll down to “Start from Data.” Select SharePoint.
- Select the site we just created as the source of data.
- You can also import data from various other sources. We’ll focus on SharePoint for now because that’s where our data lives.
- This should launch a three-screen default app based on your data input: browse, detail, and edit screens should populate automatically.
-
Hit the Preview button on the top right or ‘F5.’
- This feature allows you to view the app if it was launched.
- I recommend walking through all screens and playing around with the app, so you know how it works functionally.
- Pro Tip: If you wish to edit on preview mode, you can hold down the “alt” key and make necessary changes.
Customizations
Before we dive into specific customization, it is important to understand what controls are in Power Apps. A control is a user-interface element that helps you modify the behavior or appearance of your screens. To insert control into your app, you can refer to the insert tab on the top of Power Apps. These include labels, buttons, text, gallery, etc. Once control has been implemented, it will pop-up on the left bar, where you can easily select to edit specific controls and customize their names.
-
Themes/Colors
- You can change the look-and-feel by selecting a pre-design template located on the top left (“Home” –> “Theme”). You can also fill in your screen with the color of your liking.
-
Creating a Control
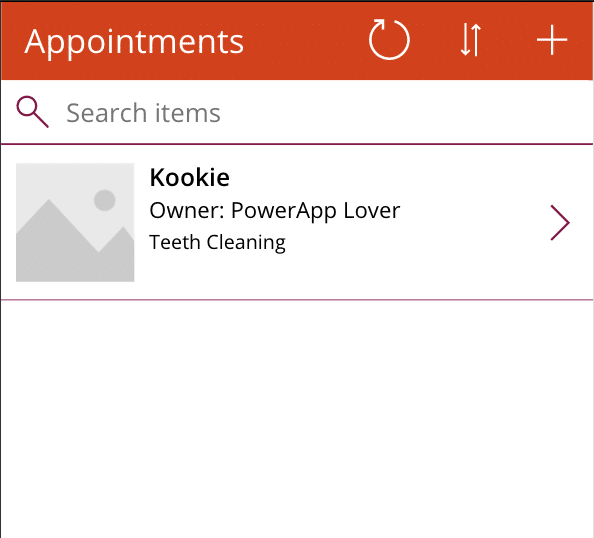
- Looking at the left bar, we are going to insert a control called Gallery. A gallery is a way of displaying list values and provides the ability to sort and filter.
- Replace the default gallery with the one you just created with a photo attached to each list item.
- We will rename our gallery control to the “appointment list” on the left bar.
-
Title of Screen
- We will also change the title of our first screen from “demo” to “Appointments” using the code input at the top.
-
Layout
- Select the gallery and select the layout “image, title, subtitle, and body.”
- Customize by manually changing the code for the first item
- Change title to pet name (this automatically applies to other list items)
- ThisItem.columnname
- Can string values with ‘&’ symbol and ‘text’ with “quotes.”
- Ex: “Owner: ” & ThisItem.’First Name’ & ” ” & ThisItem.’Last Name’
- Change title to pet name (this automatically applies to other list items)
- Our order of the list should be Pet name, owner, procedure.
-
Images
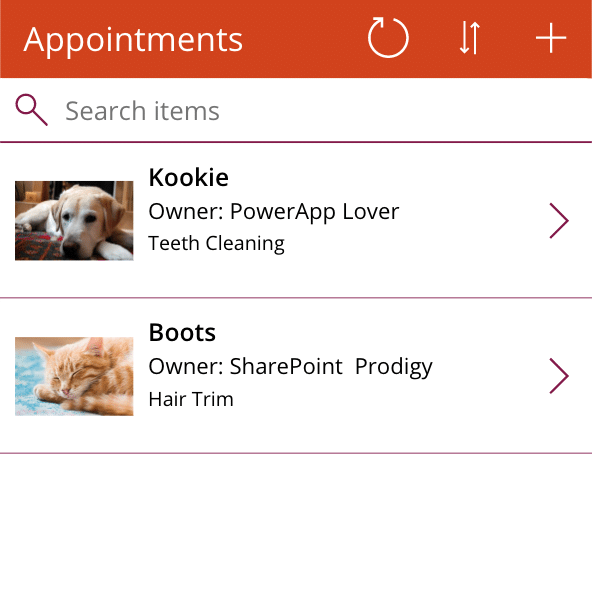
- Using Bing, we can auto-filter the best picture that meets our criteria
- Select the image icon and enter this in the code input
- “http://tsel.mm.bing.net/th?q=”& ThisItem.typeofanimal
- We concatenate the URL with the type of animal
- This tells Bing to fill in an image that matches the type of animal we have listed. The more descriptive the data, the more accurate
- Under Image Position, select “Fill” to make the image larger
- We can format the image to a circle shape by going to “Advanced” –> scrolling down to the Radius options –> entering the same code for all four radius options (“Image1.Height”)
-
Add Date/Time
- Select into the first list item and add “text label.”
- Label this ThisItem. ‘date/time.’
- Position accordingly
Other Screens
-
Edit Screen
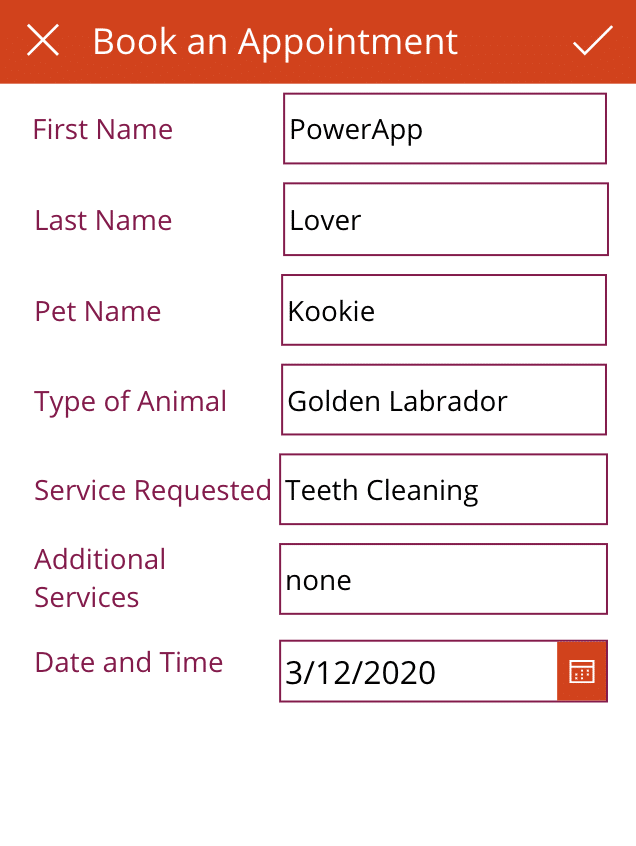
- Changing Name on Display: You can change the name of each Card by selecting the data field –> advanced –> unlock to change properties –> editing the Display Name
- Snap to two columns
- Condense the formatting of your screen by separating the data entries into two different columns
- Select the Edit Form on the left bar –> Properties –> Snap to Columns turned ‘On’ –> enter # of columns
- Changing Default Date Value to Today
-
- Select the Date Control
- Code: Today ()
- Can do the same thing for the time: Hour(Now ())
-
-
Details Screen
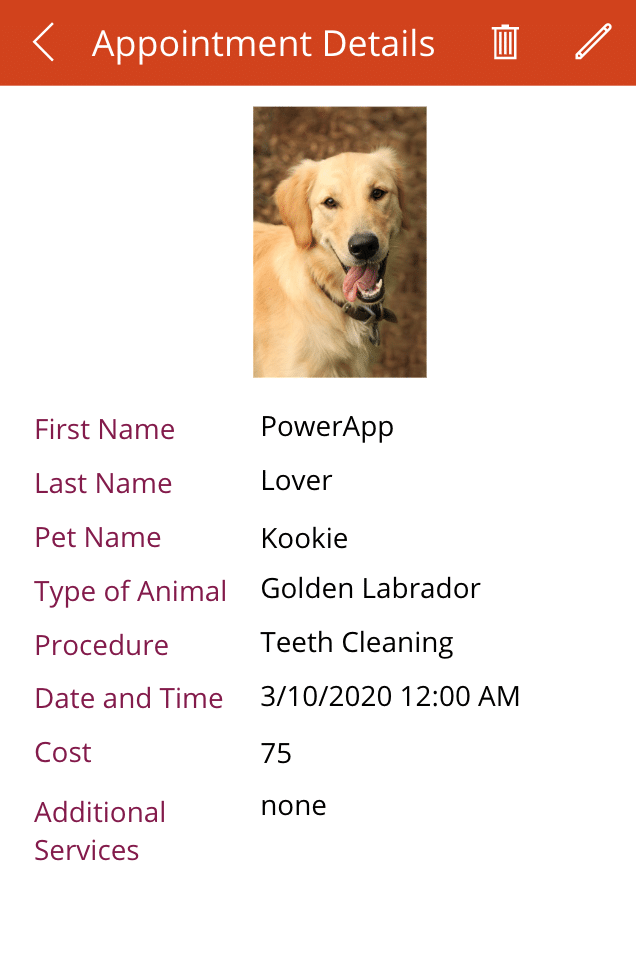
- Add a picture of the pet
- Insert –> Media –> Image
- Reference image of pet name by merely typing the control name (ex. Image 1)
- Add a picture of the pet
Conclusion
-
Hit the Preview button on the top right again to test your Power App
- This feature allows you to view the app if it was launched – Go through the different custom pages in the app and ensure that all functions work.
- I recommend walking through all screens and playing around with the app, so you are familiar with how it works functionally, and it achieves the goal you were meant to
-
Proceed to Launch/Publish
- Share it with your team or organization
- Record Data and analyze results
- Proceed to update or change the app if needed.
Klarinet Solutions has seen a lot of success in using Power Apps to make powerful, user-friendly internal tools that connect to your business data and, more so, the individuals at your organization. To learn more about creating a Power App or ways to create a unique Power App for your company, please reach out to us at 866.211.8191.